Wednesday, November 24, 2010

Super Chicken Casserole

Here is another Campbell’s Kitchen recipe I tried over the weekend, which got rave reviews.  It’s an easy chicken casserole with noodles and veggies.


Ingredients:
1/2 cup Pepperidge Farm® Herb Seasoned Stuffing, crushed
2 tablespoons grated Parmesan cheese
2 tablespoons butter, melted
1 can (10 3/4 ounces) Condensed Cream of Broccoli Soup
1 cup milk
1/2 cup shredded mozzarella cheese
1/4 teaspoon garlic powder
1/8 teaspoon ground black pepper
1 cup elbow pasta, cooked and drained
2 cups cubed cooked chicken or turkey
1 package (10 ounces) frozen peas and carrots, cooked and drained


Preparation/Cooking:
Heat the oven to 400°F.  Stir the stuffing, Parmesan cheese and butter in a medium bowl.
Stir the soup, milk, mozzarella cheese, garlic powder and black pepper in a 2-quart baking dish.  Stir in the pasta, chicken and peas and carrots.
Bake for 20 minutes or until the chicken mixture is hot and bubbling.  Stir the chicken mixture.  Sprinkle with the stuffing mixture.
Bake for 5 minutes or until the stuffing mixture is golden brown.

  
My Recommendations:
I didn’t change anything except for adding more noodles to the amount of my personal liking.  I think one cup was way too sparse, unless it meant one cup of uncooked pasta at first.  I can never tell!


 So as I said before, the hubby LOVED this one, possibly more than the pork roast.  He had two heaping plates, and the leftovers lasted one day, when I had expected them to last a little longer!


Click here to download a printable page for this recipe!

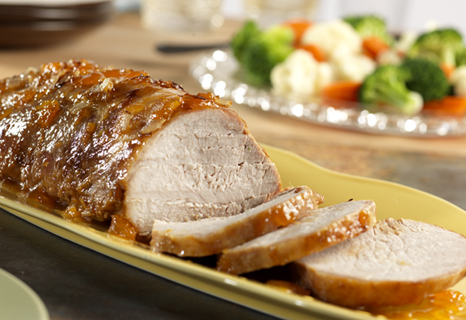
Slow-Cooked Apricot Glazed Pork Roast

Here is another awesome slow cooker meal I discovered on the Campbell's Kitchen website.  I tried it last weekend and it was husband approved.  It is very quick to prepare, then set and forget with the crock pot!  I served it with some steamed broccoli and roasted red potatoes (recipe to come soon.  I meant to take some pictures when I made them but I forgot!). Anyway, onto the recipe!


Ingredients:
1 can (10 1/2 ounces) Condensed Chicken Broth
1 jar (18 ounces) apricot preserves
1 large onion, chopped (about 1 cup)
2 tablespoons Dijon-style mustard
1 boneless pork loin roast (about 4 pounds)

Preparation:
Stir the broth, preserves, onion and mustard in a 3 1/2-quart slow cooker.  Add the pork to the cooker, trimming to fit, if needed, and turn to coat. Cover and cook on LOW for 8 to 9 hours or until the pork is fork-tender.  This can also be cooked on high for 4-5 hours.


My Recommendations:
   I actually followed this one to the letter since there isn't a whole lot of room for variation.  The only thing I did differently is that I had a roast with the bone in, because that's all the store had at the moment.  I would definitely go with the boneless next time.  Everything cooked fine, but some tiny pieces of bone cooked off and found their way into the glaze/sauce.  I haven't found any but Hubby said he did.  Cutting/serving it was also a pain.  I'd rather just be able to slice the meat like in the photo.  Also, my slow cooker is just about twice the size in the recipe, but that didn't really make a difference since the roast I bought was also a bit bigger.  The amount of glaze was still enough to cover everything too.


  So there you have it, a quick and easy roast in the slow cooker.  We all have our busy days and need meals like these.  I will definitely be trying this one again, with the boneless roast next time!

Wednesday, November 17, 2010

Make Your Own Recipe Book!

Just like the title says, that's what I worked on this week!  I had a folder full of recipes that have been printed from various websites, and it was a mess trying to sort through them to pick my next meal of the week.  The papers also got wet and dirty while I'm trying to cook, and one even got bloody when I accidentally sliced my finger with our large chef's knife...oops.

Anyway.  I'd had the idea to do this for a while, but kept forgetting about it when I actually went to the store.  I finally remembered one night and picked up what I needed.  I bought a 3 ring binder, and some of those plastic slip sheets that go inside.  I picked an orange 2" binder with plastic so I can insert my own cover, and a pack of 50 slip sheets (about 100 recipes if you use them front and back, unless some take up more than one page).  There is still a lot more room for more sheets, so the 2" is probably sufficient unless you want to get a larger size.  The whole thing cost probably $7 or $8 at Target.  The only other thing I have yet to buy are some tabs so I can sort the recipes.  It could end up costing a little more depending on the size of the binder, and how many sheets you want to buy, and add in the tabs if you decide to do so.

Since I bought the binder with plastic on the outside, I wanted to make my own cover.  It took me a while to find the inspiration for what I wanted, but thanks to Google Images, Photoshop, and a little bit of talk and inspiration from my coworker, who happens to do graphic design, I finally found images I liked and came up with a cover and a spine, and printed them on some thicker card stock we had at my work.


My next step is going to be to re-type a lot of the recipes since they don't always print the way they should.

So there you have it.  Here's an easy and cheap way to keep your recipes all together, and you can have fun making it your own!

Monday, November 8, 2010

Party Time! Seven Layer Fiesta Dip


This weekend we had my family over for some football and lots of food. The main appetizer I made was this 7 layer dip, from a recipe card I got from a grocery store a long time ago. I finally had the chance to make it, and it was a huge hit. It's very easy to make, and everything in it was fresh except for the can of refried beans.


Ingredients:
1 pkg McCormick Taco Seasoning Mix (you can get the lower sodium version if desired)
1 pkg McCormick Guacamole Seasoning Mix (or any other brand)
2 Ripe Avocados
1 16 oz. Can Refried Beans
1 ping (16 oz) Sour Cream
2 cups shredded cheese
1 cup chopped tomato
1/2 cup sliced green onions
1/2 cup black olives

Preparation:
Guacamole - Peel pit, and mash the avocados. Add the Guacamole Seasoning mix and stir until well blended. Cover and refrigerate for 30 minutes.

Sour Cream - Mix sour cream and whole package of Taco Seasoning Mix until well blended.

The Dip - Spread can of Refried beans in a shallow serving dish. Next layer on the sour cream mix over the beans. Next layer is the shredded cheese, then the guacamole. Top with tomatoes, green onions, and olives. Break out the tortilla chips, and dig in!


My Recommendations:
I would definitely use a very long and shallow dish, and make the layers a little thinner.  The first time I made this, the chips kept breaking off in the beans.  I actually didn't use the McCormick Guacamole mix, because the store I went to didn't carry it, but I found another no name brand that worked just fine.  I have used Florida avocados and regular size (from Mexico) for the guacamole.  The Florida ones are too big and make too much mix.  The regular size are great if you get them a little on the bigger side, or get 3 small ones. You could also use a store bought guacamole if you wanted, but the fresh definitely tastes great and is a lot healthier. I also figured out that pureeing the avocado up in a food processor makes a huge difference.  I used fresh tomatoes and onions, but I cheated a little and bought a small can of olives. I also didn't really keep to the measurements on those ingredients, I went by eye.  I also tried a Chipotle Taco mix when I made this another time.  Definitely recommended if you want to spice the dip up a bit.  If not, keep to the regular taco mix.  I have also learned to strain out the tomatoes after chopping them.  Otherwise the top of the dip gets really watery.  I also recommend using vegetarian refried beans if you need a vegetarian recipe. 


The Verdict:
So over all, this was very quick and easy to make, and it got multiple rave reviews. We couldn't stop eating it! There are some left overs and I will be picking at them throughout the week I'm sure. If you need a quick and easy idea for a party, this one is definitely a great one. I'm glad I finally had a chance to try it!