Wednesday, January 12, 2011

Baked Macaroni and Cheese with Peas and Ham

I have been making this dish for a while now, but finally remembered to blog it!  It's a yummy baked mac and cheese with a couple of twists.  I modified the Campbell's recipe to make it my own, and it's always a hit.  This batch is a double of the original recipe, so if you don't need a lot, you can cut everything in half.


Ingredients:
2 cans condensed Cheddar Cheese Soup
1 soup can milk
1/4 teaspoon black pepper
3 cups (about half of a 16 oz box) uncooked elbow noodles (you can also use rotini or small shells)
2 cups frozen peas
1 large or 2 small ham steaks, diced.

Preparation and Method:
Preheat oven to 400 degrees.  Start cooking the noodles to desired consistency.  While the noodles are cooking, in a 3 qt casserole dish, combine soup, milk, and pepper.  I also added a little bit of garlic powder.  Stir to mix as best you can.  Add the peas and diced ham.  Drain the noodles, and add to dish.  Stir everything until well combined.  Put in the oven and bake for 35-40 minutes (20-25 if making a half batch).  Check half way through, pull dish out of the oven to stir mix to ensure even cooking.  Return to oven and finish baking.


Recommendations:
If you want the cheese to be a little creamier, use less noodles, and add the noodles slowly so you can gauge the sauce to noodle ratio.  I have made this with too much before and the leftovers aren't very cheesy.  Also feel free to add more peas or ham if you want to.  I like to remove the skin on the outer edge of the ham steak, but that's my preference.  It doesn't make too much of a difference if you leave it on.  If you want a vegetarian meal, feel free to omit the ham, and add in other veggies or none at all if you like. 
I tend to leave the casserole in a little longer than listed because it's very thick and doesn't always cook through in the middle, but that's why I added the stirring half way through.  Just keep an eye on it if you decide to let it bake a little longer.


The Verdict:
This is a go to recipe in our house.  Everyone likes it, it lasts for a while, and we can live off of it for most of the week.  I made the original once, and it was VERY thick, so I decided to make the few additions.  Now it's a budget friendly go to recipe that I can always fall back on!

Click here to download a printable recipe page!

Monday, January 10, 2011

Slow Cooker Chicken and Dumplings

No weekend is complete around our house without a yummy Sunday dinner.  On this week's menu, it was Campbell's Kitchen's Chicken and Dumplings.  I have been wanting to try this one for a while, and finally got around to it.  I was under time constraints so I feel like I need to try it again to really get it just right, but it came out great, and I can't wait to eat my leftovers for dinner after I finish this post!


Ingredients:
1 1/2 - 2 lbs boneless chicken breast, cut into 1-inch pieces
2 medium Yukon gold potatoes, cut into 1-inch pieces (about 2 cups)
2 cups baby-cut carrots
2 stalks celery, sliced (about 1 cup)
2 cans (10 3/4 ounces each) Condensed Cream of Chicken Soup
1 cup water or chicken broth
1 teaspoon dried thyme leaves, crushed
1/4 teaspoon ground black pepper
2 cups all-purpose baking mix
2/3 cup milk

Preparation and Method:
Stir the chicken, potatoes, carrots and celery in a 6-quart slow cooker.  Stir the soup, water, thyme and black pepper in a medium bowl. Pour the soup mixture over the chicken and vegetables. Cover and cook on LOW for 7 to 8 hours (or high 4 to 5 hours), or until the chicken is cooked through. Stir the baking mix and milk in a medium bowl. Drop the batter by spoonfuls onto the chicken mixture. Increase the heat to HIGH (if not already cooking on high). Tilt the lid to vent and cook for 30 minutes or until the dumplings are cooked in the center.
My Recommendations:
I didn't vary much from the recipe on this one.  I think I misread and used too much Thyme, but not the end of the world.  I added a tiny bit of Cumin, but probably could have added some more.  It definitely needs a little bit more spice and flavor, so feel free to add a little salt and pepper, and your other favorite spices or seasonings.  I also made the spoonfuls of dumpling batter pretty large and they didn't want to cook in the center of the pot, so I would make them smaller.  They kind of turn into biscuits on top instead of dough-balls in the batter, but they are still good.  I just think mine were too big.  Like I said, it was a little rushed so I probably could have let them sit a little longer.  Other than that, I'd say feel free to add other veggies if you like.  I may add peas next time.  From reading the reviews, one of the people added chicken broth instead of water, hence why I added it in the ingredient list.  I had bought some to do this, but I forgot.  The amount of food is good, but if you need more, you can definitely make 1/2 recipe extra if you have the 6 qt slow cooker.  There was plenty of room.  


The Verdict:
Me, my husband, and his brother all loved it.  I will keep this one in my arsenal, and try a few more additions to vary it up a little bit.  What I really liked about this recipe is that I didn't have to pre-cook the chicken.  It's kind of gross and difficult cutting up raw chicken, but once it was done, I threw everything else in the pot and called it good.  I think it also helped the chicken soak up more of the flavor.  Finally I am done, and now I can go enjoy my left overs!

Click here to download a printable recipe page for this recipe!

Sunday, January 9, 2011

Breakfast Time! Ham & Egg Crepe Squares

My hubby and I were given a subscription to Everyday Food Magazine for Christmas, courtesy of his mom and stepdad.  We already received our first issue, and I promptly went through it, tagging pages of recipes to try.  I finally got to try this one this morning, and it was great!  The magazine article started with how to make the crepes (which I will include) and then it has 4 other recipes you can make with them.  I want to try one or two of the others, and I will try to post if/when I do.


First you will need to make the crepes.  This recipe supposedly makes 9.  It was my first attempt so there were a couple mess ups.  I used a little more batter than it called for, for some reason, and they ended up a teeny bit too thick.  Here is the recipe.  Sorry but I don't have any pictures of this part!

Ingredients:
1 cup all purpose flour (spooned and leveled)
1 tablespoon sugar
1/4 teaspoon coarse salt (unground sea salt)
1 1/2 cups milk
4 large eggs
3 tablespoons unsalted butter, melted

Preparation:
Combine all ingredients in a blender.  Puree until mixture is smooth and bubbles form on top (about 30 seconds).  Let batter sit at least 15 minutes at room temperature (or refrigerate in an airtight container up to 1 day).  Whisk before using.

Heat a 12 inch (or whatever medium/large size you have) nonstick skillet over medium heat.  Lightly coat with butter or spray.  Add 1/3 cup batter and lightly swirl to completely cover the bottom of the skillet.   Cook until the underside of the crepe is golden brown, about 2-3 minutes.  Loosen the edge of the crepe with a spatula, then with your fingertips, quickly flip it over.  Cook 1 minute more.  Slide crepe out of skillet, and repeat with remaining batter.  Coat pan with butter or spray as needed.


Now to make the squares!

You will need 4 more eggs (or 1 for each square you want to make), and some sliced ham.  The recipe calls for Black Forest Ham, but I just bought what was on sale at the grocery store.

Preheat oven to 350.  Place 4 crepes on a rimmed baking sheet.  If you are making more, use another sheet, or make a second batch.  Only 4 fit on one sheet.   Place 2 slices of ham on each crepe.  Carefully crack one egg into the center of each crepe, on top of the ham,  and fold the edges toward the center.  Season with coarse salt and ground pepper.  I used my sea salt grinder and pepper grinder.  Bake until egg white is set and yolk is still runny, about 12 minutes.


The Verdict:
No modifications or recommendations on this one, it's pretty straight forward.  It just takes a little practice to get the crepes just right.  I made them a little too thick and they didn't want to fold over very easily, but they worked well enough.  If you don't need all 9, then you can make half of the crepe recipe.  Otherwise you end up with a ton of extra batter.  We loved these.   They are light, and tasty, and pretty low calorie.  I'll definitely be making them again!

Click here to download a printable page for this recipe!

Thursday, December 30, 2010

Chicken and White Bean Soup

Hello All, I hope you had a good Christmas!  I was on vacation, and therefore, not motivated to do much of anything computer related, aside from playing the Sims.  But that doesn't mean I wasn't cooking!

I adapted this recipe from a couple I had, and it turned out fabulous!  It was originally supposed to be a white chicken chili, but ended up as a soup, and I was not disappointed.  I've learned if I want something to thicken, I need to get a good stock pot and cook on the stove.

I had all the ingredients, and kind of winged it as far as amounts go, so I will try to guestimate, but use your judgement depending on pot size and amount you actually want to make.  This filled a 6 qt slow cooker nearly to the brim, and it took a while, and me bringing some to work for my coworkers for us to get rid of it all!


Ingredients:
6-8 cups Chicken stock or broth
2-3 16 oz cans of White Kidney (Cannellini) Beans (I used 3)
5-6 cups diced cooked (or boiled) chicken
2 cans Cream of Chicken condensed soup
1-2 cups Salsa of your choice
1 cup water
1-1.5 cups chopped onion (I use sweet onions in everything)
1-2 Tablespoons Chili Powder
1-2 Tablespoons Oregano
2-3 Garlic cloves, minced
1/4-1/2 teaspoon Cayenne powder
1-2 tablespoons Cumin (my new favorite spice!)
If you like other spices, or some salt and pepper, feel free to add those in if you like
Shredded Monterey Jack Cheese - for serving on top of soup (optional)


Preparation:
There's really not much to it.  I boiled a few large chicken breasts and diced them up.  Then everything went into the crock pot and was mixed well.  Set the crock pot for 6-8 hours on low and you're done!  You oculd also cook on high 3-4 hours.  When it's done, stir, and serve topped with the shredded cheese or even a little sour cream, or let cool and store/refrigerate!


The Verdict:
No modifications for this one since it was somewhat my own.  Like I said, this was a combo of two recipes, and it came out way better than I ever expected!  We definitely ended up with a lot so if you don't want or need a whole lot, cut the recipe in half, or you can make the whole batch, then freeze the rest.  It was very flavorful and tasty.  Hubby and I both had quite a bit over the week our portion lasted, and 2 of my coworkers had some that I brought to work, and all I heard was rave reviews, especially since one of them ate 3 or 4 bowls over 2 days, then handed me the empty container with a big smile on his face.  It helps to have a husband and guy coworkers that are garbage disposals I suppose :)

Edited to Add:
I have also cooked this in the soup pot on top of the stove.  If you need it more quickly than in the slow cooker, go this route.  You can just toss everything in, and since it will be boiling, you can put the chicken in raw after you dice!

Click here to download a printable page for this recipe!

Monday, December 13, 2010

"Puppy Chow" or "Muddy Buddies"

I know this recipe as Puppy Chow, but the Chex Mix website calls it Muddy Buddies.  I decided to make this yummy treat over the weekend, and yes it is already gone.  To my defense, I did bring it to my parents house on Saturday, and then brought some into work for my co-workers today.  But I probably did eat most of it myself with some help from the Husband.

(Finally taking my own pictures, LOVE my new little camera!)

Ingredients:
9 cups Rice Chex®, Corn Chex® or Chocolate Chex® cereal (or combination)
1 cup semisweet chocolate chips
1/2 cup peanut butter
1/4 cup butter or margarine
1 teaspoon vanilla
1 1/2 cups powdered sugar

Preparation:

1. Measure cereal; set aside in large bowl.
2. In 1-quart microwavable bowl, microwave chocolate chips, peanut butter and butter uncovered on High 1 minute; stir. Microwave about 30 seconds longer or until mixture can be stirred smooth. Stir in vanilla. Pour mixture over cereal, stirring until evenly coated. Pour into 2-gallon resealable food-storage plastic bag.
3. Add powdered sugar. Seal bag; shake until well coated. Spread on waxed paper to cool. Store in airtight container in refrigerator.
My Modifications:
Only one for this one, I remember doing step 2 on the stove in years past, so I did just that. The microwave usually ends up in an explosive mess of some sort. I also only used store brand corn "Chex." I wanted to use chocolate, but the only thing they had was Cinnamon, so I decided to be cheap. I may mix Chocolate and Cinnamon if/when I make this again, and if I can find both. Also, use more sugar to coat if necessary.
As I said earlier, this didn't last very long. I hadn't had it in a long time so I decided on a whim to make it. There are TONS of other recipes on the Chex site that look yummy so I might have to try those in the near future too!

Tuesday, December 7, 2010

Savory Herb-Crusted Chicken (or Turkey) Pot Pie

Ok faithful readers, here is yet another trial from the Campbell's Kitchen website.  The recipe originally says Turkey pot pie, but you can substitute chicken if you prefer, or in my case, that's what's in the fridge. I'm currently eating this for dinner while I type, and so far so good!


Ingredients:
1 egg
1 tablespoon water
6 cups diced cooked turkey or chicken
5 cups frozen mixed vegetables or your favorite frozen vegetable blend
2 tablespoons butter
1/2 cup all-purpose flour
2 cups Chicken Broth or Chicken Stock
1/4 teaspoon ground black pepper
1/2 package Pepperidge Farm® Puff Pastry Sheets (1 sheet), thawed according to package directions
2 tablespoons coarsely chopped fresh herbs (parsley, thyme and/or oregano)

Preparation:
Heat the oven to 400°F. Mix the turkey/chicken and vegetables in a 3-quart shallow baking dish. Heat the butter in a 2-quart saucepan over medium heat. Add the flour and cook and stir for 3 minutes. Gradually stir the broth into the saucepan. Cook and stir for 5 minutes or until the mixture boils and thickens. Stir in the black pepper. Pour the broth mixture over the turkey mixture.Unfold the pastry sheet on a lightly floured surface. Roll the pastry sheet into a 13x9-inch rectangle. Place the pastry over the filling. Press the pastry to the rim to seal. Beat the egg and water in a small bowl with a fork. Brush the pastry with the egg mixture and sprinkle with the herbs. Bake for 25 minutes or until the pastry is golden brown and the filling is hot and bubbling.

My Recommendations:
I followed this one to the letter except for the fresh herbs part. I love fresh herbs, but could not find oregano at the store, and figured it would taste just as fine with dried parsley and oregano that I already had in house. I didn't use Thyme. I also didn't have the full size dish, or a rectangular one for that matter, since my 3 qt spontaneously combusted in the sink one day (no it was not hot! At least according to my hubby :) ). My options were to go .75 qt smaller or 1.5 qt bigger, so until I get another dish, I opted for the smaller of the two. To save time, I just boiled the chicken breasts and then diced them. I didn't use the full amount, since my dish was a little smaller. Having the oval dish made the crust part a little awkward as well, but it worked out alright. I think I'm going to add more chicken broth to the broth mixture. The butter evaporated pretty quickly, and the flour kind of congealed when I added the broth, so I used a whisk to break it up while it was cooking. I think the extra broth will also help add some extra flavor, which I think is needed. I usually don't salt things but I put a little salt on my meal tonight, so I'll be adding a little of that as well, along with a few other spices to kick the flavor up a little bit. Other than that, it's fabulous! Hubby likes it too, so another plus in the recipe book!

The Verdict:
Overall, I really like this recipe.  I've been looking for an easy pot pie after the one I kind of put together myself didn't really work out too well.  As I said, I'll be adding a few more things to kick the flavor up a bit, possibly trying cream of chicken soup instead of the broth/flour mixture.  The only thing about this recipe is that it isn't as quick as some of my others, but if you have the time and don't mind making a bit of a mess, go for it!

I'm trying two more new recipes for next week, so stay tuned!

Click here to download a printable page for this recipe!

Wednesday, November 24, 2010

Super Chicken Casserole

Here is another Campbell’s Kitchen recipe I tried over the weekend, which got rave reviews.  It’s an easy chicken casserole with noodles and veggies.


Ingredients:
1/2 cup Pepperidge Farm® Herb Seasoned Stuffing, crushed
2 tablespoons grated Parmesan cheese
2 tablespoons butter, melted
1 can (10 3/4 ounces) Condensed Cream of Broccoli Soup
1 cup milk
1/2 cup shredded mozzarella cheese
1/4 teaspoon garlic powder
1/8 teaspoon ground black pepper
1 cup elbow pasta, cooked and drained
2 cups cubed cooked chicken or turkey
1 package (10 ounces) frozen peas and carrots, cooked and drained


Preparation/Cooking:
Heat the oven to 400°F.  Stir the stuffing, Parmesan cheese and butter in a medium bowl.
Stir the soup, milk, mozzarella cheese, garlic powder and black pepper in a 2-quart baking dish.  Stir in the pasta, chicken and peas and carrots.
Bake for 20 minutes or until the chicken mixture is hot and bubbling.  Stir the chicken mixture.  Sprinkle with the stuffing mixture.
Bake for 5 minutes or until the stuffing mixture is golden brown.

  
My Recommendations:
I didn’t change anything except for adding more noodles to the amount of my personal liking.  I think one cup was way too sparse, unless it meant one cup of uncooked pasta at first.  I can never tell!


 So as I said before, the hubby LOVED this one, possibly more than the pork roast.  He had two heaping plates, and the leftovers lasted one day, when I had expected them to last a little longer!


Click here to download a printable page for this recipe!

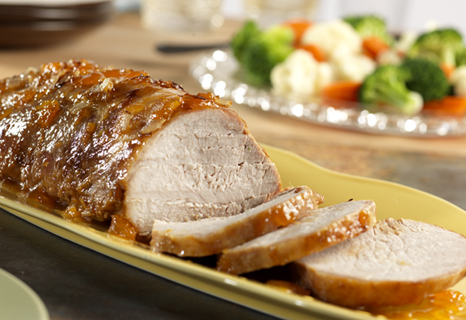
Slow-Cooked Apricot Glazed Pork Roast

Here is another awesome slow cooker meal I discovered on the Campbell's Kitchen website.  I tried it last weekend and it was husband approved.  It is very quick to prepare, then set and forget with the crock pot!  I served it with some steamed broccoli and roasted red potatoes (recipe to come soon.  I meant to take some pictures when I made them but I forgot!). Anyway, onto the recipe!


Ingredients:
1 can (10 1/2 ounces) Condensed Chicken Broth
1 jar (18 ounces) apricot preserves
1 large onion, chopped (about 1 cup)
2 tablespoons Dijon-style mustard
1 boneless pork loin roast (about 4 pounds)

Preparation:
Stir the broth, preserves, onion and mustard in a 3 1/2-quart slow cooker.  Add the pork to the cooker, trimming to fit, if needed, and turn to coat. Cover and cook on LOW for 8 to 9 hours or until the pork is fork-tender.  This can also be cooked on high for 4-5 hours.


My Recommendations:
   I actually followed this one to the letter since there isn't a whole lot of room for variation.  The only thing I did differently is that I had a roast with the bone in, because that's all the store had at the moment.  I would definitely go with the boneless next time.  Everything cooked fine, but some tiny pieces of bone cooked off and found their way into the glaze/sauce.  I haven't found any but Hubby said he did.  Cutting/serving it was also a pain.  I'd rather just be able to slice the meat like in the photo.  Also, my slow cooker is just about twice the size in the recipe, but that didn't really make a difference since the roast I bought was also a bit bigger.  The amount of glaze was still enough to cover everything too.


  So there you have it, a quick and easy roast in the slow cooker.  We all have our busy days and need meals like these.  I will definitely be trying this one again, with the boneless roast next time!

Wednesday, November 17, 2010

Make Your Own Recipe Book!

Just like the title says, that's what I worked on this week!  I had a folder full of recipes that have been printed from various websites, and it was a mess trying to sort through them to pick my next meal of the week.  The papers also got wet and dirty while I'm trying to cook, and one even got bloody when I accidentally sliced my finger with our large chef's knife...oops.

Anyway.  I'd had the idea to do this for a while, but kept forgetting about it when I actually went to the store.  I finally remembered one night and picked up what I needed.  I bought a 3 ring binder, and some of those plastic slip sheets that go inside.  I picked an orange 2" binder with plastic so I can insert my own cover, and a pack of 50 slip sheets (about 100 recipes if you use them front and back, unless some take up more than one page).  There is still a lot more room for more sheets, so the 2" is probably sufficient unless you want to get a larger size.  The whole thing cost probably $7 or $8 at Target.  The only other thing I have yet to buy are some tabs so I can sort the recipes.  It could end up costing a little more depending on the size of the binder, and how many sheets you want to buy, and add in the tabs if you decide to do so.

Since I bought the binder with plastic on the outside, I wanted to make my own cover.  It took me a while to find the inspiration for what I wanted, but thanks to Google Images, Photoshop, and a little bit of talk and inspiration from my coworker, who happens to do graphic design, I finally found images I liked and came up with a cover and a spine, and printed them on some thicker card stock we had at my work.


My next step is going to be to re-type a lot of the recipes since they don't always print the way they should.

So there you have it.  Here's an easy and cheap way to keep your recipes all together, and you can have fun making it your own!

Monday, November 8, 2010

Party Time! Seven Layer Fiesta Dip


This weekend we had my family over for some football and lots of food. The main appetizer I made was this 7 layer dip, from a recipe card I got from a grocery store a long time ago. I finally had the chance to make it, and it was a huge hit. It's very easy to make, and everything in it was fresh except for the can of refried beans.


Ingredients:
1 pkg McCormick Taco Seasoning Mix (you can get the lower sodium version if desired)
1 pkg McCormick Guacamole Seasoning Mix (or any other brand)
2 Ripe Avocados
1 16 oz. Can Refried Beans
1 ping (16 oz) Sour Cream
2 cups shredded cheese
1 cup chopped tomato
1/2 cup sliced green onions
1/2 cup black olives

Preparation:
Guacamole - Peel pit, and mash the avocados. Add the Guacamole Seasoning mix and stir until well blended. Cover and refrigerate for 30 minutes.

Sour Cream - Mix sour cream and whole package of Taco Seasoning Mix until well blended.

The Dip - Spread can of Refried beans in a shallow serving dish. Next layer on the sour cream mix over the beans. Next layer is the shredded cheese, then the guacamole. Top with tomatoes, green onions, and olives. Break out the tortilla chips, and dig in!


My Recommendations:
I would definitely use a very long and shallow dish, and make the layers a little thinner.  The first time I made this, the chips kept breaking off in the beans.  I actually didn't use the McCormick Guacamole mix, because the store I went to didn't carry it, but I found another no name brand that worked just fine.  I have used Florida avocados and regular size (from Mexico) for the guacamole.  The Florida ones are too big and make too much mix.  The regular size are great if you get them a little on the bigger side, or get 3 small ones. You could also use a store bought guacamole if you wanted, but the fresh definitely tastes great and is a lot healthier. I also figured out that pureeing the avocado up in a food processor makes a huge difference.  I used fresh tomatoes and onions, but I cheated a little and bought a small can of olives. I also didn't really keep to the measurements on those ingredients, I went by eye.  I also tried a Chipotle Taco mix when I made this another time.  Definitely recommended if you want to spice the dip up a bit.  If not, keep to the regular taco mix.  I have also learned to strain out the tomatoes after chopping them.  Otherwise the top of the dip gets really watery.  I also recommend using vegetarian refried beans if you need a vegetarian recipe. 


The Verdict:
So over all, this was very quick and easy to make, and it got multiple rave reviews. We couldn't stop eating it! There are some left overs and I will be picking at them throughout the week I'm sure. If you need a quick and easy idea for a party, this one is definitely a great one. I'm glad I finally had a chance to try it!